Making a Kabuto (Japanese Samurai Helmet) with Kydex
Navigation:
- HELMET: Making a Kabuto (Japanese Samurai Helmet) with Kydex
- MASK: Making a Men Yoroi (Mempo) for a Japanese Armour
- SLEEVES:Making a Kote and Tekko (Armored Sleeves with upper and lower plates and hand plates)
- CUIRASS: Making a Japanese Do (harness or cuirass) in the lamellar style with kydex kozane plates
Bauanleitung in deutscher Sprache auf halloland.de:
Bau eines Samurai Helm (Kabuto) und Nackenschutz (Shikoro) -selber machen DIY
Englisch language:
I want to share with you my experience with making a kabuto – a japanese samurai armor helmet- with kydex. It works. However, since I assume that some experts might read this, I think I should write a disclaimer…
My goals, Motivation & Disclaimer
I don´t have much space, no garage, no work bench and not many tools at hand. I needed to build everything in my kitchen. My goal was to spend as few money as possible and buy as few new tools as really needed. I took am minimal budget approach. Things can certainly be done much better with better equipment, more work space, patience and better craftsmanship.
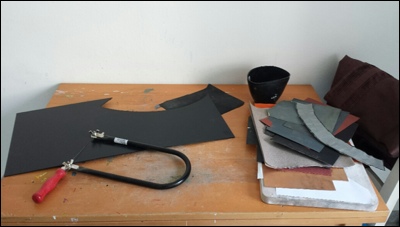
My limited work space (kitchen table) for making my kabuto with kydex
My kydex helmet is ment to be a prototype. I have never formed a helmet before and I wanted to gather some experience before I use metal (which I still intend to do later, in a better environment for handy craft). I have indeed learned a lot and will be able to do a better job, next time, regardless what material I will use. This time, not everything is perfect. Don´t expect this website to show you „the best way to a perfect historical kabuto“. I only show you one way.
I tried to stick as close to some historical originals that I saw on some pictures, as possible. However, I did not do the best possible job, which is due to -again- my abilities, my equipment and also to the material, itself. I needed to improvise here and there, so in the end my helmet is no historical model of anything. It is just my helmet.
Kydex is a great stuff to work with, however, next time, I will use metal, simply because kydex (I used 2,4mm strong boards) is thicker and much less flexible than metal. I don´t think it is the right material if you want to have a helmet that could be taken for an original. For a more historical look, metal is the best choice.
My helmet is not built for combat. I guess it could be use, therefore, but I don´t know. It is pretty stabile and I don´t think one could cut through with a sword. However, that was not my intention. I only wanted to build a helmet that looks nice on my head and in the cupboard. Not more.
My face -and as it seems also my head- is not 100% symmetrical. Since I used plaster positives as basis for forming shapes with kydex, and since the positives where not totally symmetrical, the entire helmet is not totally symmetrical. That gave me some pain when it came to cutting the shapes and riveting them together. However, it perfectly fits my head, even though if you take a close look, you will notice that it is not perfectly symmetrical. Also I botched here and there when it came to measuring things. I relied on my visual judgement on or two times to often.
Also, I want to refer to Mr. Bryants Website „Nihon Katchû Seisakuben – Online Japanese Armour Manual“ which is the best source of information for everyone who wants to build a japanese armour. It is a „must read“ and you will notice that I tried to follow his instructions as good as my ability, material and equipment allowed my to do.
There might be different and better approaches than the one I took. I don´t say my approach is the best. However, I thought I share it with you so that you know about advantages and disadvantages of my approach and can do it better. There is no need to follow my way, so please don´t understand this description as a perfect „how to“- instruction. Just go ahead as you like. If you want to take 1000 steps, the most important step is always the very next one. Keep that in mind and you are set.
Making the plaster Model of my Head
In order to form the kydex later you will need a solid model of your head. The better the model is, the better will be the result in the end. As a matter of fact, making the model, took me quite a bit of time.
I used plaster bandage to get a negative of my head shape. I wore a plastic bathing cap for the negative plaster shape of my head. That was funny.
After the negative shape where hardened, I smoothened the surfaces (the „inside“ of the negatives, of course) a little, since it showed clearly the structure of the bandages. I stabilized the negative model with more plaster on the outside and prepared it so that I could pour the shape out with plaster in order to get positive model. For splitting negative and positive model apart, later, I whetted the surface of the negative with washing up liquid. After that, I pore plaster inside, which I stabilized with additional bandage. I added layer by layer, slowly, let it dry, then continued. until the negative form was filled with plaster.
After everything was dried, I could easily break the negative and ended up with pretty rough positive models of my head. The washing up liquid made it easy to split both shapes apart.
Now it got more tricky since I needed to get the surface of the model smooth and in good shape without making it much smaller and not too much larger.
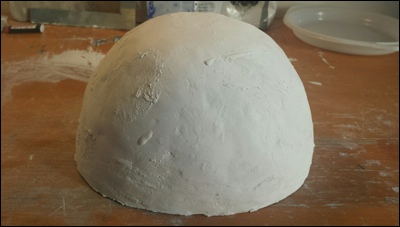
Plaster model of my head shape. The surface still need to be smoothened.
I took me quite a while to smoothen and form the model of my head. As mentioned above, I did not manage to get a perfectly symmetrical shape. I can only recommend to spend some time to make the head shape as perfect as possible, since the kydex will ideally take the exact shape of the model, later. So the better the model, the better the result.
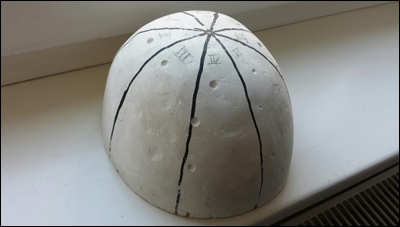
This is how it now looks, after the helmet is done. I might use it again for other helmets.
Making the patterns for the helmet
I decided to build a bowl out of 8 pieces. More pieces might be hard to manage, simply because the kydex I used, had 2,4mm in thickness. With more pieces – riveted together in overlaps- I think the helmet would be to massive and look bizarre, in the end.
In order to decide which form the pieces need to have, I covered the plaster model with duct tape and then plotted the pieces onto the duct tape – using a felt pen. Here, I again noticed, that my head model (my head?) is not totally symmetrical. It was pretty difficult to get symmetrical shapes.
Cutting the kydex in the right pieces
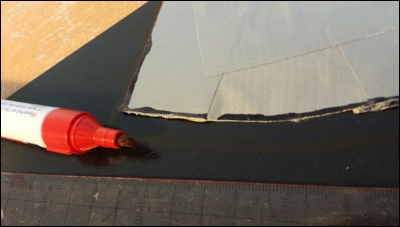
I took the duct tape off the model and cut out the shapes with scissors.
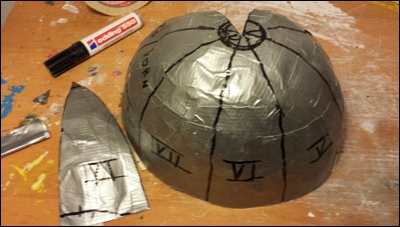
Duct Tape taken off the model. Cutting lines plotted onto it. Then I cut it in pieces.
I applied the shapes to the kydex board. Since the shapes where not „flat“ but showed the form of the model, I added some space to the right of the shape, when I plotted the shape onto the kydex with my felt pen.
Note that in contrast to the shape you see on the picture above, the plates don´t need a tip. They don´t close up tightly at the top of the bowl, in the end. There will be a hole. So cut away the tips of the pattern.
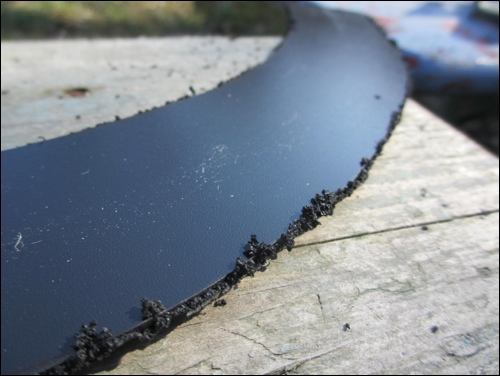
I cut out my eight piece with a jig saw. After I had cut out the first, I decided not to use all eight duck tape models as a basis, since they all where slightly different. I rather decided to use only one shape and make all eight shapes identical. The kydex is easy to saw, however, you will get very rough and ugly edges. I used sandpaper to smoothen the edges.
Forming the bowl with kydex plates
Before I applied the kydex shapes to my plaster model, I plotted the intended position of each piece onto the model, so that I know where to put each shape.
I put one piece of kydex in the oven. I learned that it is easier to form if it is heated to 180 degrees celsius, rather than 160. A bit hotter is a bit better. When it was hot, I took it out (wearing think leather gloves), and pressed it on the right spot onto the model, by hand. That worked pretty well. After it was cold and hard, I put it away and only then warmed up the next piece of kydex and applied it to the right spot on my model. This way, I formed all eight pieces.
Now, I had formed all eight pieces. individually. The where all a bit larger than they needed to be (in all directions – kydex streches if heated, and I gave myself a bit leeway). The tricky thing, however, is that I wanted them to overlap. With my 2,4mm kydex board this meant, that now when I overlapped the pieces, the entire bowl was slightly out of form again. In the end this was not a big issue.
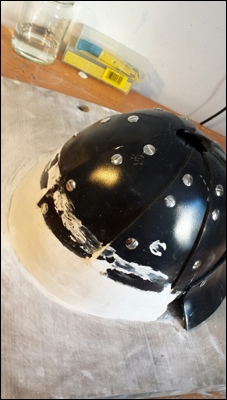
I recommend that you write numbers in the right sort order on all plates so that you know in which exact position of the bowl the need to be placed later. The individual pieces are not exchangeable, every piece has its specific place. I order to see if all worked out, I fixed all eight pieces with duct tape and gave it a try. The bowl as such fitted really well. Since I gave the plates a little leeway, the bowl was actually a bit to deep and the lower rim was pretty uneven. I left it this way for now and decided to cut the lower rim in a better shape, later.

It fits. However, the lower rim is very uneven and will need additional cutting and smoothing.
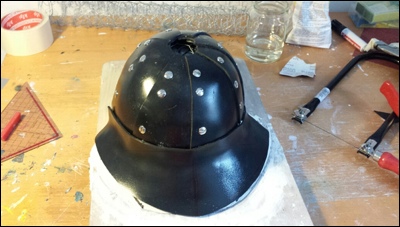
Screwing the plates together and making the bowl
Next, I riveted the plates together. I did that, before I cut away more material at the lower rim. I took plate number one, put it on the plaster model, put piece number two at its underlapping position, drilled four holes and used screw rivets to rivet the platters together. So I continued with all eight pieces, until the bowl was done. It worked out and it fit my head pretty well.
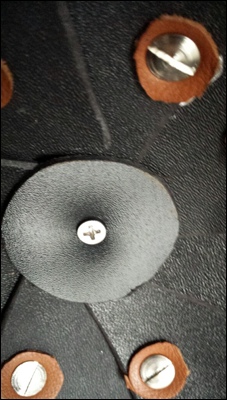
I used screw rivets. Unfortunately, they where only available with 5mm length. With my 2,4 mm Kydex (4,8mm in overlap), the screw rivets where a little to long. I decided to not shorten them all manually (48 rivets, 4 per plate), but I cut out small, circular pieces of leather, punched a hole in the middle and feed those pieces under the screw rivet – on the inside of the helmet.
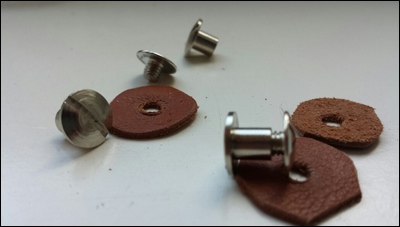
Screw Rivets and Leather Underlayers for riveting the eight plates of the helmet together.
I don’t particularly like the slits in the screw rivets on the outside of the helmet. If you can find better rivets or a nicer way of putting the plates together, go for it. I still went for the cheap standard screw rivets (four Euros for ten rivets) because I noted that kydex is not so easy to glue and I could´t find reasonable alternatives. I tried epoxy adhesive with kydex. Glueing is not a good solution.You can get nicer screw rivets in saddlery shops, but then you end up paying two Euros per screw rivet. (I needed 48 just for the bowl). However, after having screwed all eight plates together (I used 4 rivets per plate), the helmet was very stabile and solid. Even though the rivets and leather took some space in the inside, the bowl still perfectly fitted my head.
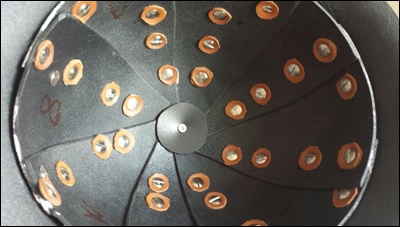
A look at the inside of the helmet, after I riveted the plates together.
After the bowl was not put together, I took a larger metal saw and cut the lower rim the way I wanted it to be. Basically I cut it straight so that it ends above / behind the ears . I cut it a little shorter at the front. And in the end I used sand paper to smoothen the rim.
Forming and fixing the visor
I took several different approaches to design a visor that I could add to the bowl. It was not so easy. I threw away some versions and refused various approaches. Here, I will show the approach that I finally took.
In order to form a nice and well fitting visor, I finally decided to first of all build the specific pattern, again. To get the pattern, I built a plaster bedding where I could take the pattern from. The plaster bedding also served well for forming the kydex on to. It is a work intense step, but I didn´t find another solution.
I fixed the bowl in some hight above the table to, so that I had enough space to form a plaster bedding for a dropping visor shape. Then, I modeled the visor bedding.
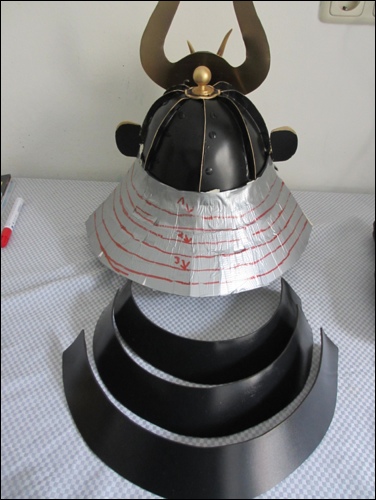
Plaster bedding for the visor. Note, that the bowl on the picture shows a hole on the top. Thats by design. The kydex plates should not close the bowl on top, but form a hole. It will be closed later.
I plotted the intended form of the visor onto the dried plaster – just to double check. I covered the plast with duct tape and plotted the visor shape on the duct tape. Then I took the duct tape of and cut the pattern.
I cut the visor pattern out of the duct tape and applied that form to the kydex plate.
This gave me the right pattern that I then cut out of the kydex board. This method has the advantage that the kydex plate will easily bend into the plaster bed. So finally, I heated up the piece of kydex and pressed it onto the plaster bedding, wearing thick heather gloves, again. By the way, I decided to go for a pretty large and wide visor. You can go for any shape you like. Since the visor will be riveted to to bowl, make sure the visor is large enough to do that.
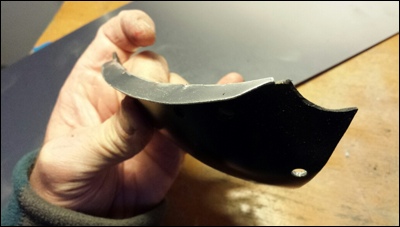
Visor is in shape. Now it can be riveted on to the bowl.
Forming the base for the neck guard
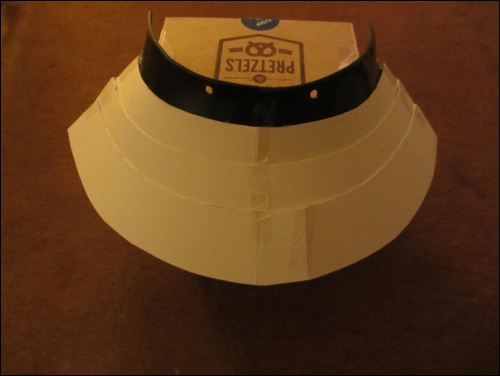
I took the same approach to build the part of the neck guard that is riveted to the helmet. Here, I was pretty uncertain about how long it should be and how far it should bend around the bowl. I found some pictures of helmets where the neck guard looked like it was in one piece with the visor; I also found pics of helmets where there is a clear space between visor and neck guard. I went for the version with some space in between.
Plaster bedding for forming the pattern of the neck guard

Neck guard pattern for the helmet
Plotting the pattern on the kydex board
I cut the shape out of the kydex, heated the kydex plate in the oven and pressed it onto the plaster bed. As usual, I gave it a bit leeway in size, so after the kydex was in shape, I needed to take the jig saw and finished the edges and rims. I kept the pattern of the neck guard since it will serve me later again when I build additional three neck guard plates, which I will be tying to the first.
Then, I riveted visor and neck guard to the bowl. In historical versions, the visor is attached to the bowl with three rivets. Not more. That did not work out for me. I used four rivets and spreaded them differently than it is done with metal helmets. I did that to make sure that the visor is attached solidly.
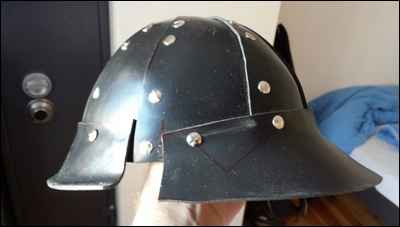
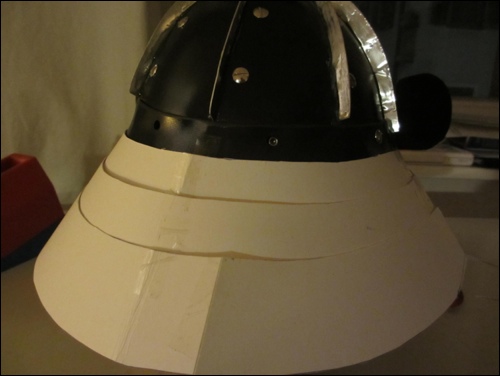
Bowl with visor and neck guard attached to it. It all looks pretty rough and edgy, still.
Since the neck guard was rounded at the lower rim and since I thought that this will make it more difficult tying on additional neck guard plates, I took a hot air gun, heated the lower rim and strechted the material until it was straight. I was worried that the kydex might loose shape, but it worked.
At this stage, the helmet takes shape, but as you can see it still looks pretty rough and ugly. It gets a little better, if you sand paper all the edges, make then sharper, rounder, smoother etc. However, I have the impression that with kydex you will always have a much rougher appearance than with metal.
Faking the fold of the helmet plates
Metal helmet bowl plates usually show a fold. They don´t just overlap, but one edge of each plate is bent upwards, a little. Since I was not really happy with the appearance of my helmet at this stage and since it is simply not possible to bend the kydex plats likewise, I decided to fake these folds. Since the entire helmet had a pretty rough look, I even exaggerated the folds. (Would not exaggerate so much, again.)
I purchased a 1 mm aluminum board. I unscrewed the entire helmet again until everything was taken apart.
In order to apply the faked fold to each of the eight bowl plates, I first of all needed to straighten and smoothen the edges of each bowle plate. I re-worked on them until I had each edge really straight.
Then, I cut the faked fold shapes out of the aluminum board (an individual shape per plate), kept three loops, which I bent back for 90 degrees. These aluminum loops where large enough to cover three of the four already existing drilling holes in the plate. I used these holes in the plate to drill through the aluminum loops. I did this for all eight plates.
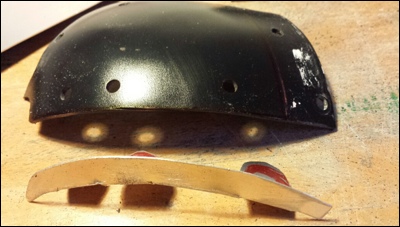
Faked aluminum folds for the bowl of my kabuto
The faked fold fitted smoothly to the plate.

The faked fold has three bent aluminum loops with holes, so that when the bowl is screwed together, the already existing rivets will also hold the fake folds.
Then I screwed everything together again. So the fake folds where fixed by the already existing drilling holes and rivets.
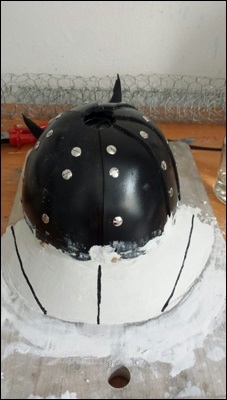
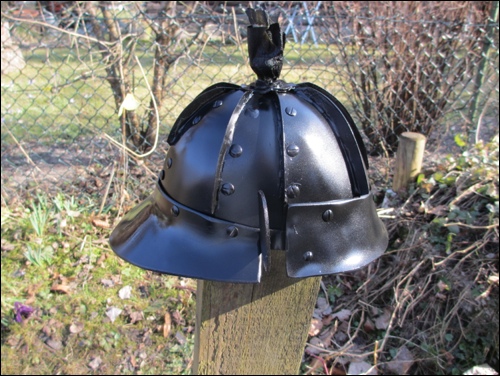
The faked folds are now attached to the bowl.
The faked fold in the front of the helmet is shorter than the others, wich reach down to the edge of the visor or neck guard. The front fake fold does not, since here I will fix the crest holder, later.
Finally, I used sand paper again to smoothen the faked folds and get them in nearly identical shape, so that they looked alike. Next time, I would make them a littler shorter.
Closing the whole on the top of the helmet with ornamental work (tehen-no-kanamono)
As mentioned above, the bowl still has a hole on top, since the kydex plates do not fit together, if you don´t leave a hole. I closed this by cutting out two kydex circles in the size that could cover the hole. One went inside the bowl, on on the top.
Kydex circle on the inside of the helmet. Closing the hole (hachi).
On top of the helmet, I wanted to have a nice accessory. I found a cupboard handle which I thought fits well, optically. I heated the kydex circle and fitted it nicely on the top of the hole. I cut two more smaller circles and drilled a hole through all of them. Then, I simply fixed them by screwing the cupboard handle through all four cirlces.
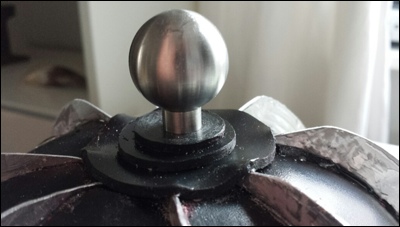
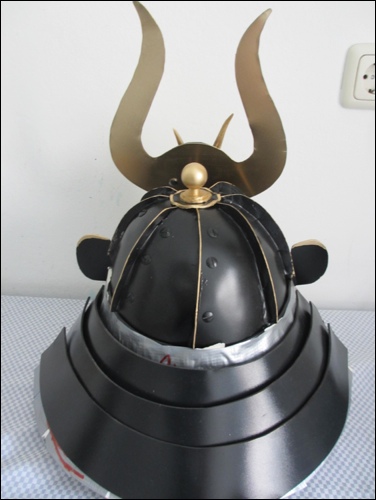
Top of the kabuto
Adding the ear protection (fukikaesi no egawa)
Many but not all kabutos I looked at, showed a shield / additional protection above the ears. I think they might be called „fukikaesi no egawa“. I tried various forms and shapes but the flexibility of my working material was limited. So I decided to go for a small version. I cut out two identical kydex shapes with my jig saw. I made them oval shaped but kept a 7 cm long strip of kydex at the bottom of the oval shape. I heated this strip with my hot air gun, bend it for about 9o degrees and fitted the hot kydes between the bowl and the neck guard. Therefore I unscrewed the neck guard, first. I order to fix the shield to the bowl, I used an already existing hole – the first hole of the neck guard- and fixed the neck guard, shield and bowl with one rivet. This saved me from having to drill another hole. And the screw rivet was just long enough.
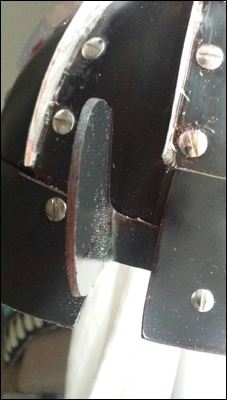
Additional protection
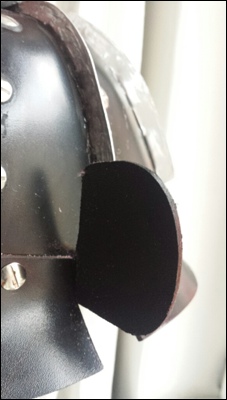
Nice additional accessory
Building the crest holder and crest
Building a nice crest holder that looks like on the original historical helmets was not easy. Kydex is not stabile enough to build delicate, sophisticated little features like crest holders. So I needed to come up with a solution that is stabil and still half way nice.
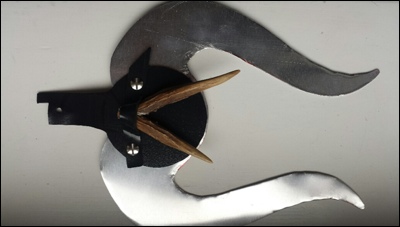
So basically, I skipped the crest holder and built a crest that included the holder. Here, everyone may get creative. In the end, you can either stick to some original that you find online or you build something you like. I decided to cut a kydex circle with a flap.
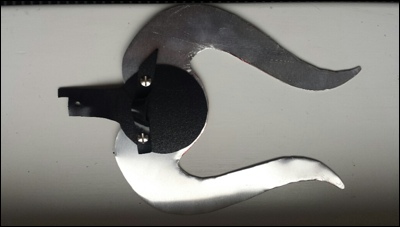
Part of the final crest for the kabuto
I designed a bullhorn-like shape on paper and as soon as I was happy with the design, I cut it out of the remains of my aluminum board. I riveted the aluminum shape to the „crest holder“. The aluminum shape is not very stabile, however, it is light and if it should break, I can easily fix any other symbol or form. You may go for a different material.
In the middle of the circular element of the crest holder, I added a flap. This is meant to take the tips of the antlers of a row bark.
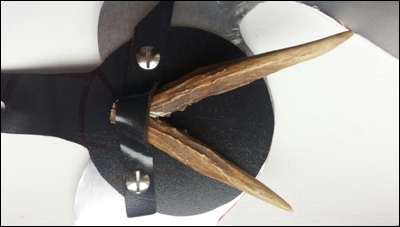
Row bark antlers integrated into the crest.
Aluminum horns and row bark antlers
At the bottom go the flap, you can see a little edge. This is meant to go beyond the visor, it fits in between visor and bowl. Additionally, I drilled a hole into the flap and into the bowl and fixed everything with an additional rivet.
Now, all parts are assembled.
Laquering
Now I gave the helmet and the crest some color. I decided to go for black and gold.
Black lacquering

Gold laquer for the crest
See below, how the color looks if everything is assembled, again.
Building the entire Neck Protection
In addition to the first pattern of the neck guard which is riveted to the bowl, I now built the entire neck protection. Therefore, I unriveted the first plate and built a set of three patterns from paper.

Neck Guard Patterns
In order to see if they would fit, I built a paper prototype.
Testing the fit of the paper neck guard pattern
I also put the prototype on my head in order to see if the neck protection would touch my shoulders to neck. I did not want it to hinder my movements if I wear the helmet, but at the same time I wanted the guard to be long enough to protect my neck from sword blows.
Paper prototype attached to the helmet
This time, I thought I could speed up cutting the kydex plates by using an electric stick saw instead a manual one. However, this did not really save much time. The electric stich saw is – obviously- too hot. The kydex rather melted and I needed to sand the edge quite a bit in order to get it smooth again. I recommend sawing kydex manually by hand – non electric.
Cutting Kydex with an electric stich saw
After having cut and sand the kydex patterns, I built a pretty solid base for forming the hot kydex. Therefore I built pretty solid duct tape patterns and marked precicely where I intended to put the kydex patterns. Before, however, I thought about the drill holes for the ropes. This way I made sure that I have a sufficient amount of overlapping of the patterns – but also not too much. See the drill hole pattern below.
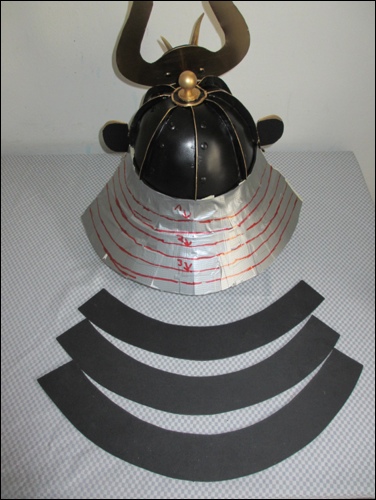
Duct Tape patterns as a basis for forming the hot kydex plates into the right shape
Then I applied the warm kydex plates to my prototypical base.
Kydex neck guard plates
As always, it needed some additional cutting and sanding here and there in order to get everything as symmetrical as possible.
Kydex plates fit okay
I had thought a lot about the ropes I wanted to use for knotting the plats together. I went for pretty strong ropes and a knotting pattern that I took from some historical pictures. I removed the core fibres of the rope and gave the ropes a slight ironing in order to get them in a rather flat shape.
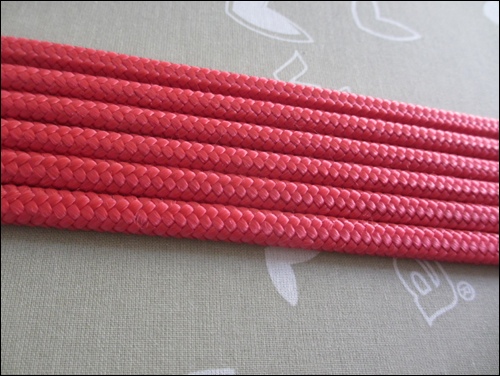
After having removed the core fibres from the rope, I gave them a light ironing in order to get them in the right shape
Then I tested the rope with various drill holes of different sizes until I found the right drill hole size. Target was, to find a a size that I could still squeeze the rope through, just so. The hole should not be visible after everything is knotted together. So it is important to keep the hole as small as possible and just so large enough to get the laces through.
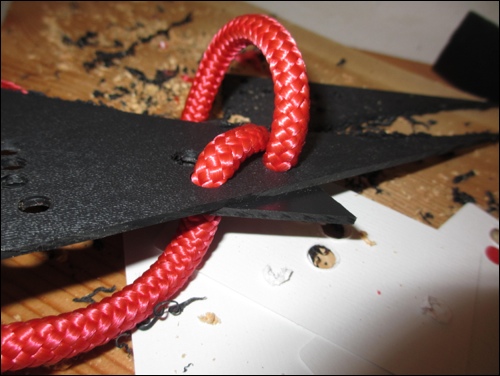
Finding the right rope and trying it out in order to identify the best size for the wholes
After I decided in with pattern I would want to knot the plates together, I developed and tested a drill hole pattern that I would then apply to the plates. As you can see here, the rope fits through the holes just so.
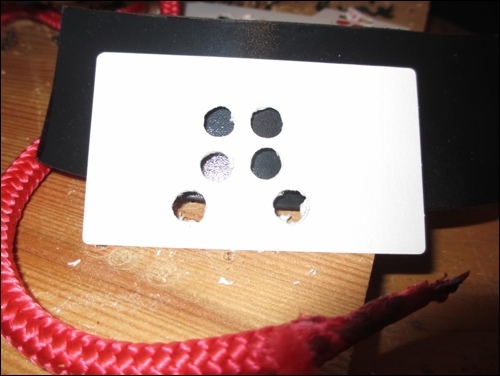
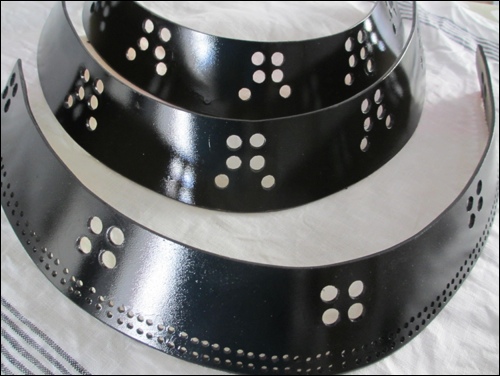
Drill pattern for braiding the plates together
After having drilled the holes, I gave it a try and knotted everything together, following some historical examples that I found.
Knoting the plates together
The knotting is quite some work. You want to make it tight, however, this means that it is quite tricky to get the laces through the holes. It is easier if you melt the tip of the laces to a point, using a lighter. And you might want to use a gripper to pull the rope through the holes. Otherwise you might break your finger nails, after a while.
After having knotted everything together, I thought it looked okay. So I took it apart again and gave the plates some color.
Lacquering the plates
I thought it might look nice if I add a rather ornamental lace at the bottom of the last plate. Therefore I drilled two rows of smaller holes at the bottom the plate. I used a smaller lace of a different color, here.
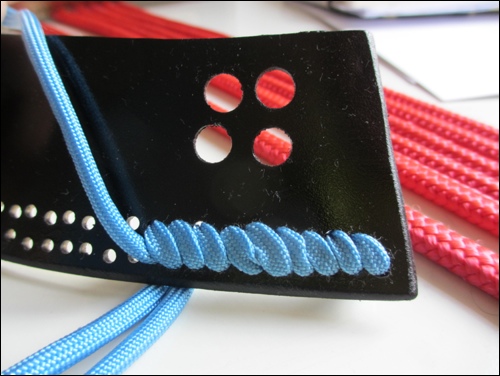
Ornamental work
Make sure you take a lace that is long enough. Again try to drill the smallest holes that work. The holes should not be visible after the laces are applied. Try to not twist the laces so that they look nice. Also, there should not be any space between the laces. Every slope need to be right next to to the other.
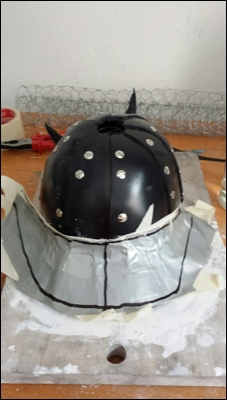
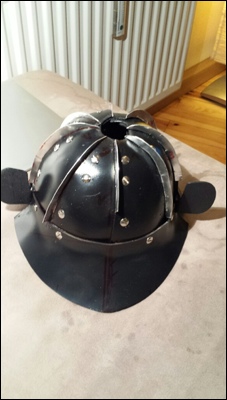
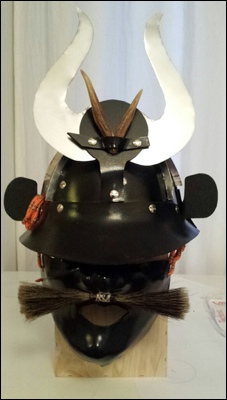
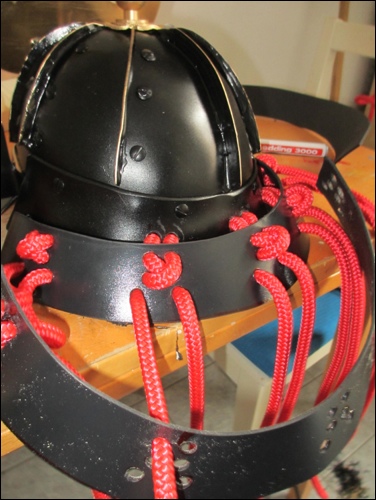
After that, I laced the entire neck guard to the helmet. Here you can see the helmet with the neck guard attacked.

Helmet and Neck Guard
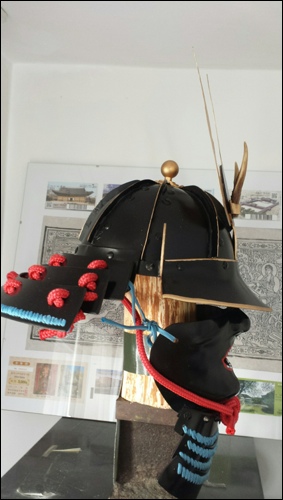
As you can see, the laces between the neck guard plates make sure that there is some room between the plates. This gives some quite a bit of flexibility even though the are fixed together in a very stabile manner. Thats – to my knowledge- how it should be.
🙂
Navigation:
- HELMET: Making a Kabuto (Japanese Samurai Helmet) with Kydex
- MASK: Making a Men Yoroi (Mempo) for a Japanese Armour
- SLEEVES:Making a Kote and Tekko (Armored Sleeves with upper and lower plates and hand plates)
- CUIRASS: Making a Japanese Do (harness or cuirass) in the lamellar style with kydex kozane plates
Yuri Lee on 09 Jan 2017 at 15:22 #
There needs to be space between the helmet and your skull for it to offer any protection. Real helmets had suspension liners so your head floated inside the helmet. If somebody actually hits you in the head when you’re wearing this helmet you’ve made, it will almost be as though you’re wearing nothing at all.
admin on 11 Jan 2017 at 17:22 #
Thanks for your feedback – this is a very valid point, indeed. I do use a leather inlay with the helmet. However, next time, I´d design it a little larger and would build in a suspension system, indeed. As often done, I intended to use wollen fabric wrapped in shape with laces. Makes it also more comfortable to wear. I originally intended to do so from the beginning, but when I put all pieces together, it ended up a little to tight for an inlay.
Tyler on 04 Apr 2017 at 00:50 #
pretty awesome man, I am looking into making my own Kabuto soon, just wasnt sure what to make the hachi out of.. i want to either do it out of metal or leather, metal obviously offering better protection, but a lot harder to shape and work with. i believe its the tate hagi-no-ita (?), the elongated triangular plate pieces that are riveted together to form the hachi, that i don’t exactly know how to form.. i like that you used a mold of your head, but as you overlap the pieces and rivet them together, wouldnt that make the bowl smaller? so do you have to compensate by making the tate hagi-no-ita wider so that they can overlap? i was reading on another website that a guy was using something called a kata? even though ive tried figuring out what a kata is and can only come up is something related to martial arts, which cant be right. idk, just started reading about this the other day, ill probably be starting my project soon. ill let you know how it goes!
admin on 05 Apr 2017 at 09:02 #
Thanks for your comment. I used the positive shape of my head for overlaying and riveting the pieces of the Kabuto together. So it did not get smaller at that stage but covered the head shape perfectly. However, next time, I would actually make it larger in order to get some space for a buffer between head and helmet. I actually use a thin leather inlay; but originally, there should be enough space for a wollen cap that should go inside.
admin on 05 Apr 2017 at 09:04 #
..and yes, please do let us know how you proceed with your project!
Don on 24 Apr 2019 at 20:12 #
You did an excellent job! The disclaimer was hysterical. You should never have to explain to the “professionals.” They should keep their comments to themselves anyway.
Very cool