Making a Face Armour Mask (Men Yoroi /Mempo) for a Japanese Armour
Navigation:
- HELMET: Making a Kabuto (Japanese Samurai Helmet) with Kydex
- MASK: Making a Men Yoroi (Mempo) for a Japanese Armour
- SLEEVES:Making a Kote and Tekko (Armored Sleeves with upper and lower plates and hand plates)
- CUIRASS: Making a Japanese Do (harness or cuirass) in the lamellar style with kydex kozane plates
Bauanleitung in deutscher Sprache auf halloland.de:
Japanische Gesichtsmaske (Mempo oder Men Yoroi) mit Halsschutz selber bauen
English Language:
After having build the helmet (see part 1) I thought I should also build a face armour to fit the helmet. Read about my motivation and read my disclaimer in see part 1.
Making a plaster model
I started covering my face with plaster bandages. I had put a solid layer of skin cream on my face, before I put the bandages on. Since I did this with no help, I put the bandages on to my face, sitting in front of a mirrow, however, I laid down on my back and kept pressing the plaster bandages into my face, while the plaster was drying. I had some straws in my mouth through wich I breathed. This was actually pretty funny.
After the plaster was dry, I took it off and stabilized it with additional plaster from the outside, so it might hold the positive model and won´t bend.
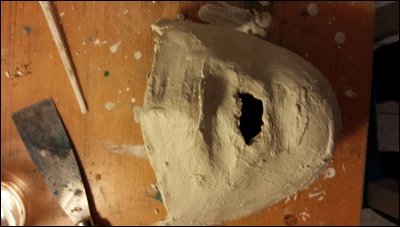
This is the negative model of my face. It was fun making it.
I closed the mouth hole with a fresh layer of plaster bandage and straightend and grinded the edges. I put a solid layer of dish washing soap into the negative model and then filled the negative with fresh plaster bandages and a lot of solid plaster layers.
When everything was dry, I broke away the negative model and then smoothened and shaped the face. I defined where I would like the face armour to end. Also I exaggerated some features like nose and chin, since I wanted to give it a more aggressive, threatening appearance. However, I should have exaggerated even more, simply because the kydex with its 2,4mm thinkness will smoothen the features.
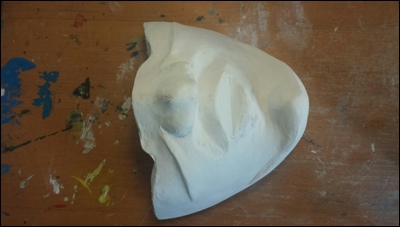
Plaster model of my face, meant to serve as basis for modeling the kydex mask.
Making the face model took like 80 % of the time I spent for this project. As soon as you´ve got the model, you are almost there. For that reason, take you time to shape a nice and smooth model. The better the model, the better the result.
Applying the kydex to the face model
I decided to do the face armour in one piece rather than following the original – usually they consist of more than one part, which are riveted together.
However, the kydex is 2,4 mm strong and since this is way thicker than metal, making the face armour in three parts would have made everything pretty massiv and rough.
I heated a piece of kydex in the oven and when it was hot enough I applied it to the face model. I wore think leather gloves and pressed it onto the model as good as I could until it was to cold to form. I used a fan to heat some edges here and there in order to optimize the mask.
I managed to nicely apply the kydex to most of the parts of the model. However, pulling the kydex over the chin did not work out as nicely as I hoped, since you can pull and stretch the material, but you cannot compress it.
When I was happy, I took the mask off the model, cut and smoothened the edges, cut out the opening for the nose and the mouth. I drilled two holes for fixing the mask to the helmet, later.
I used hairs from the back of wild european boars for the mustache which I fixed on the upper lipp.
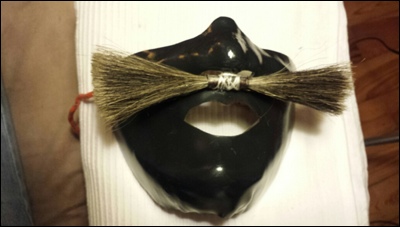
Japanese face armour (mempo/men yoroi) with mustache
You can see that the chin part is not ideal. However, I will leave it as it is.
After that, I riveted two nice metal grommets to the helmet.
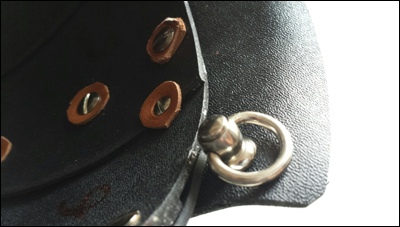
Grommet to fix the face armour to the helmet
I fixed two nice laces to the face armour. On one side, the lace is fixed to the grommet with a simple knot. On the other side, I can hook the lace to the grommet with a little hook. This way, I can open the face armour. It will dangle on the one lace.
Now, all parts are assembled.
Adding the throat protection plates
After everything was assembled, I decided to add the throat protection to the face guard. Also I wanted the face guard to look more like the original versions in terms of coloring and appearance.
First of all, I developed a paper pattern which I intended to rived to the bottom of the face mask. This was meant to be the basis of the throat guard.
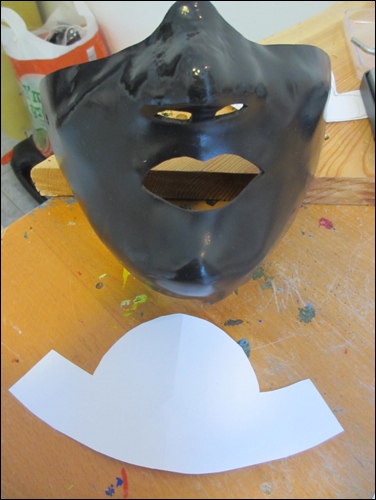
Paper pattern for the base plate for the throat protection
After I thought that the paper pattern would fit, I cut out the kydex pattern, heated it and gave it a try. It needed some sanded and re-heating of the kydex with a hot fan before I was kind of happy with the result. Unfortunaltey, the entire construction was not really symmetrical.
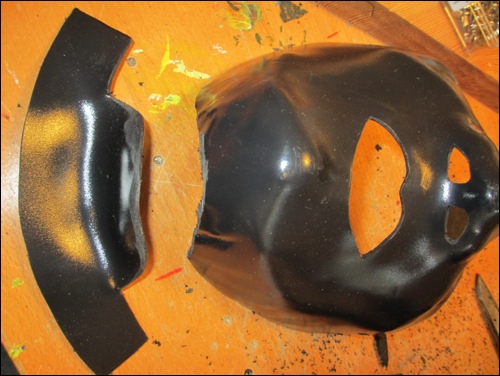
Kydex base plate the throat protection
Nevertheless, I riveted this base plat to the mask. Again it needed some re-heating with the hot fan until I was kind of happy.
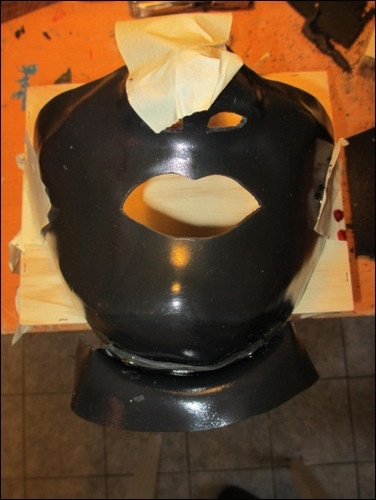
Base plate for the throat protection riveted onto the face guard
On the picture above you can see the base plate riveted to the face mask. The edges are not yet symmetrical. I left it this way since the other throat guard plates would hide the edges, anyways.

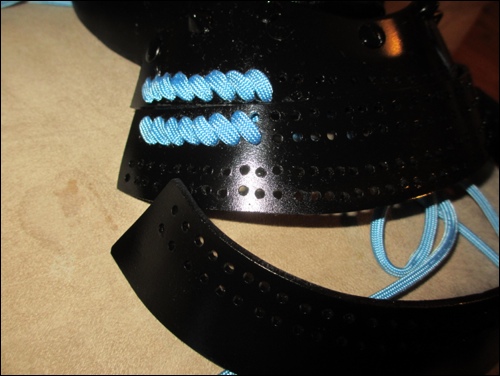
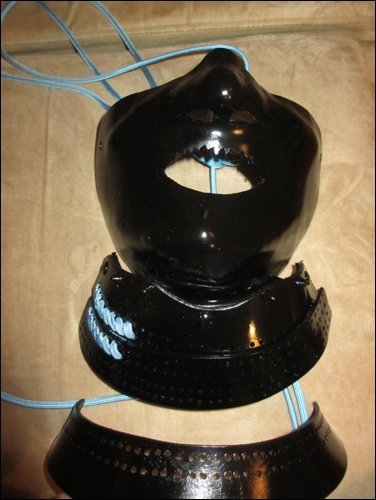
Three throat guard plates, one already riveted to the base plate.
I decided to go for three throat guard plates. As usual, I built paper patterns first and built a paper prototype (no pics). Then I cut the kydex plates, heated the kydex and put it in shape. On the picture above you can see that I riveted the first, smallest plat to the base plate.
After that, I drilled the holes for the laces to go through. I used the smalls holes possible. They where so small that it took me some effort to get the laces through. However, it is essential for the optical appearance that the holes are not visible anymore, after the lacing. Also, there should be no space between the loops of the laces. They need to be straight next to each other.
knotting the plates together
Drilling the holes was pretty tricky, really, since I needed the same amount of holes at the top of the lower plate as I had at the bottom of the upper plate. However, since the lower plat is -of course- longer, it was not so easy to the get right distances between the holes – and still make sure that no space would show between the slopes of the lacing.
Quite a bit of work…
I lacquered the plates after having drilled the holes and before lacing, of course. Also, I was not happy with the appearance of the mouth of the head guard. I wanted to add teeth. However, there was too little room between the bottom of the nose and the upper lip to add nice teeth. I ended up with some mouse-like spiky teeth. Not ideal. You can do it better than this.
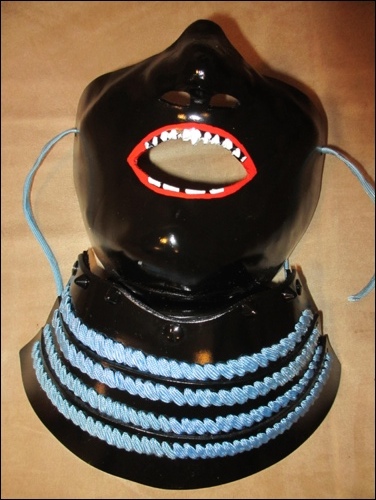
Laquered face- and throat guard including lips and teeth.
I painted white teeth and added red lips to the face mask.
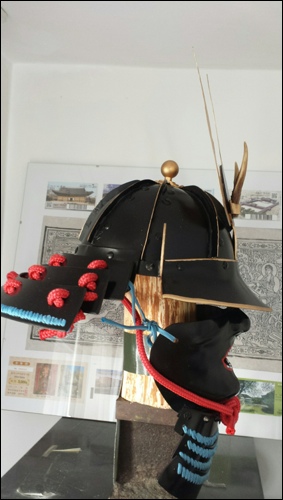
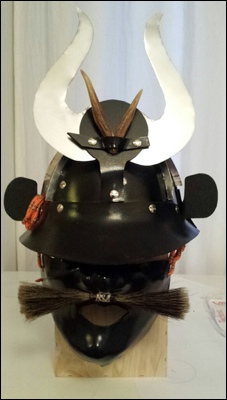
I added some lacing tho the inner of the helmet and added a rope which would hold the face mask in place. I tried it out. If you pull the rope tight, the face mask and helmet appear like one solid unit. It feels pretty save. I don’t think a sword could cut through, so easy.
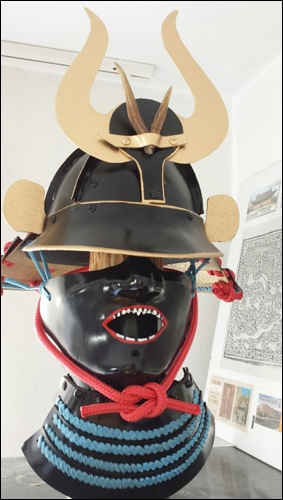
Face guard and kabuto
Navigation:
- HELMET: Making a Kabuto (Japanese Samurai Helmet) with Kydex
- MASK: Making a Men Yoroi (Mempo) for a Japanese Armour
- SLEEVES:Making a Kote and Tekko (Armored Sleeves with upper and lower plates and hand plates)
- CUIRASS: Making a Japanese Do (harness or cuirass) in the lamellar style with kydex kozane plates